Imagine standing on a picturesque lakeside, witnessing the magical transition between day and night. As the sun sets and the sky transforms into a sublime canvas of shades of blue, a question arises in your mind: how can you capture the essence of this fleeting moment in a stunning image? In this article, we will explore the techniques and tips that will enable you to seize the beauty of the blue hour in your photographs, creating captivating visuals that will leave a lasting impression.
Understanding the Blue Hour
Definition of the Blue Hour
The blue hour is a period of time before sunrise and after sunset when the sky takes on a beautiful blue hue. This magical time is highly sought after by photographers due to its soft, diffused light and captivating colors. The blue hour occurs when the sun is below the horizon, and the indirect sunlight is scattered in the earth’s atmosphere, creating this enchanting atmosphere.
Duration of the Blue Hour
The duration of the blue hour varies depending on several factors, such as the time of year, the location, and the weather conditions. Generally, it can last anywhere from 20 to 40 minutes, although it may be longer in certain areas. It’s important to keep track of the sunrise and sunset times to plan your photography session accordingly and make sure you capture the entire blue hour.
Reasons to Capture Images During the Blue Hour
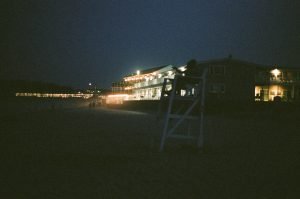
There are several reasons why photographers love capturing images during the blue hour. Firstly, the soft, diffused light creates a beautiful and ethereal atmosphere that adds a sense of tranquility to your images. The blue tones in the sky also provide a stunning backdrop for various subjects, from landscapes and cityscapes to portraits and still life. Additionally, the blue hour offers a unique opportunity to experiment with long exposures and capture motion blur, creating artistic and dynamic images. By taking advantage of the blue hour, you can elevate your photography and capture stunning images that stand out from the crowd.
Equipment and Settings
Camera Equipment
To capture stunning images during the blue hour, you’ll need certain camera equipment. A digital camera with manual settings is ideal as it allows you to have full control over your exposure. A wide-angle lens or a lens with a focal length between 24mm and 50mm is recommended for capturing the expansive sky and incorporating the surrounding elements into your composition. Additionally, a sturdy tripod is essential to keep your camera steady during longer exposures.
Essential Accessories
In addition to your camera and lens, there are a few essential accessories that can enhance your blue hour photography. Graduated neutral density filters can help balance the exposure between the bright sky and the darker foreground, preventing overexposure or underexposure. A remote shutter release or cable release is also useful to minimize camera shake when capturing long exposures. Finally, a flashlight or headlamp can come in handy for adjusting camera settings in the dark.
Recommended Camera Settings
To achieve the best results during the blue hour, it’s important to set your camera to the appropriate settings. Start by setting your camera to manual mode to have full control over the exposure. Use a low ISO setting, such as ISO 100 or 200, to minimize noise and maintain image quality. Opt for a small aperture, around f/8 to f/11, to ensure a wide depth of field and keep your entire scene in focus. Finally, choose a slower shutter speed, between 10 to 30 seconds, to capture the subtle movements and ambient light of the blue hour.

This image is property of images.unsplash.com.
Planning and Preparation
Researching Locations
To make the most of the blue hour, it’s essential to research and identify potential locations beforehand. Look for landscapes, cityscapes, or architectural structures that would complement the ethereal atmosphere of the blue hour. Consider popular spots that are known for their stunning views during this time of day, but don’t be afraid to explore lesser-known areas for a unique perspective. Online resources, photography forums, and social media platforms can provide valuable insights and recommendations for blue hour photography locations.
Scouting in Advance
Once you have identified potential locations, it’s crucial to scout them in advance. Visit the locations during different times of day to get a sense of the lighting conditions, composition possibilities, and any potential challenges you may face. Note the direction of the sunrise or sunset, as well as any interesting foreground elements or leading lines that could enhance your composition. By scouting in advance, you’ll be well-prepared to capture stunning images during the blue hour.
Weather Conditions
Weather plays a significant role in blue hour photography, as it greatly influences the mood and lighting of your images. Keep an eye on the weather forecast, paying attention to cloud coverage, fog, or mist, as these elements can add depth and drama to your photographs. Overcast skies can create a softer, more diffused light during the blue hour, while a clear sky can result in vibrant colors and striking silhouettes. Embrace different weather conditions and plan accordingly to capture unique and captivating images.
Composition and Framing
Incorporating Leading Lines
Incorporating leading lines in your composition during the blue hour can add depth and guide the viewer’s eye through the image. Look for natural or man-made elements such as roads, rivers, fences, or architecture that can serve as leading lines. Position yourself in a way that allows these lines to draw attention towards the key focal points of your image. Leading lines can create a sense of movement, leading the viewer’s gaze towards the vibrant blue sky and creating a visually captivating image.
Utilizing the Rule of Thirds
The rule of thirds is a fundamental compositional technique that can help create a balanced and visually pleasing composition. Imagine a grid divided into thirds both vertically and horizontally over your frame. Position your main subject or points of interest along these grid lines or at their intersections to create a sense of balance and harmony. During the blue hour, this technique can be particularly effective in creating a compelling composition with the captivating blue sky as a backdrop.
Using Foreground Elements
Including foreground elements in your composition is an excellent way to add depth and create a sense of scale during the blue hour. Look for interesting objects or elements that can serve as foreground subjects, such as rocks, trees, flowers, or architecture. By placing these elements in the foreground, you can create a visually engaging image that draws the viewer’s eye from the front to the background, allowing them to appreciate the full beauty of the blue hour.

This image is property of images.unsplash.com.
Managing Exposure
Understanding Exposure Basics
Understanding the basics of exposure is crucial for capturing stunning images during the blue hour. Exposure refers to the amount of light that reaches the camera’s sensor, and it is determined by three factors: ISO, aperture, and shutter speed. During the blue hour, it’s important to find the right balance between these settings to achieve a properly exposed image. Experiment with different combinations and review your histogram to ensure you’re capturing the desired details and tones in your photograph.
Utilizing Filters for Balancing Exposure
Filters are essential tools for balancing exposure during the blue hour, especially when dealing with a high dynamic range scene. Graduated neutral density (ND) filters are particularly useful as they can darken the bright sky while maintaining the proper exposure for the darker foreground. Place the filter in front of your lens, positioning the darkened portion over the sky. This way, you can achieve a more balanced exposure and preserve the details in both the sky and the foreground.
Using Exposure Bracketing
Exposure bracketing involves taking multiple shots of the same scene at different exposures. This technique is especially useful during the blue hour when the lighting conditions can be challenging. Set your camera to bracketing mode and adjust the range of exposures you want to capture. By doing this, you ensure that you capture the full range of tones, from the brightest highlights to the darkest shadows. Later, in post-processing, you can merge these images to create a well-exposed final image that showcases the beauty of the blue hour.
Mastering White Balance
Understanding the Impact of White Balance
White balance refers to the color temperature of light and can greatly impact the mood and overall look of your image. During the blue hour, white balance becomes even more critical as the blue tones in the sky are central to creating the desired atmosphere. Different white balance settings, such as daylight, cloudy, or tungsten, can result in various color shifts and tones. Understanding the impact of each white balance setting is essential for accurately representing the beauty of the blue hour in your images.
Choosing the Right White Balance Setting
When shooting during the blue hour, setting your white balance to the “Daylight” or “Cloudy” preset can often produce the most accurate and pleasing results. These settings retain the cool blue tones of the sky while ensuring that other elements in the scene are not overly warm or cool in appearance. However, don’t be afraid to experiment with different white balance settings to achieve creative or dramatic effects that complement your subject or the overall mood of your image.
Shooting in RAW
Shooting in RAW format is highly recommended when capturing images during the blue hour. RAW files retain more information and give you greater flexibility in post-processing. Since the blue hour lighting can be challenging to capture accurately, shooting in RAW allows you to make adjustments to white balance, exposure, and other settings without sacrificing image quality. This way, you can correct any color temperature issues or fine-tune the overall look of your image to accurately reflect the beauty of the blue hour.

This image is property of images.unsplash.com.
Working with Light
Using Natural Light
The blue hour provides a unique opportunity to work with natural light and create stunning images. The soft, diffused light during this time of day can add a sense of serenity and tranquility to your photographs. Experiment with different angles, positions, and compositions to capture the ethereal qualities of the blue hour light. Take advantage of the warm and cool color contrasts that occur during this time to create visually striking images and draw attention to your subject.
Experimenting with Artificial Light
While natural light is often the primary focus during the blue hour, don’t be afraid to experiment with artificial light sources as well. Incorporating streetlights, city lights, or even handheld flashlights can add a unique and creative touch to your blue hour images. Play with different light sources and experiment with their positioning to create interesting light patterns, silhouettes, or even light painting effects. Combining natural and artificial light sources during the blue hour can result in truly captivating and dynamic photographs.
Creating Silhouettes and Shadows
Silhouettes and shadows can add drama and mystery to your blue hour images. Utilize the low light conditions to capture bold and striking silhouettes against the vibrant blue sky. Position your subject against the bright background and expose for the sky to create a dark silhouette. Shadows cast by structures, trees, or even people can also add depth and interest to your composition. Experiment with different angles and positions to capture captivating and creative silhouettes and shadows during the blue hour.
Enhancing Colors and Contrast
Utilizing Post-Processing Techniques
Post-processing is an essential step in enhancing the beauty of your blue hour images. Editing software such as Adobe Lightroom or Photoshop provides various tools and adjustments to fine-tune your photographs. Pay attention to color temperature adjustments to accurately represent the blue tones in the sky. Enhance the vibrancy and saturation of the blues and other colors to bring out the richness and depth of your image. Additionally, consider adjusting contrast, clarity, and sharpening to make your subject and overall composition stand out.
Adjusting Saturation and Vibrance
When editing your blue hour images, adjusting the saturation and vibrance can make a significant difference in enhancing the beauty of the colors. Saturation refers to the intensity or strength of a color, while vibrance specifically affects the saturation of more muted colors. Use these adjustments subtly to bring out the blues and other hues without overpowering the natural tones of the scene. Strive for a balanced and pleasing image where the colors appear rich and vibrant but still realistic.
Enhancing Contrast
Enhancing contrast can add depth and dimension to your blue hour photographs. Adjusting the contrast allows you to emphasize the separation between the different tones in your image, making it more visually striking. Be careful not to overdo it, as excessive contrast adjustments can result in unnatural-looking images. Aim for a balance between the shadows, midtones, and highlights that preserves the mood and details of the blue hour while creating a visually appealing and dynamic image.
Adding Movement and Atmosphere
Experimenting with Long Exposures
Long exposures can create a sense of movement and dynamism during the blue hour photography. By using slower shutter speeds, you can capture the subtle motion of clouds, water, or other moving elements in your scene. This technique can add a dream-like quality to your images, producing soft and ethereal effects. Use a sturdy tripod to keep your camera stable and experiment with different shutter speeds to achieve the desired amount of motion blur. Long exposures during the blue hour can result in unique and captivating images that evoke a sense of tranquility and movement.
Capturing Motion Blur
In addition to long exposures, capturing intentional motion blur can add a sense of energy and liveliness to your blue hour images. Experiment with shooting moving subjects, such as people or vehicles, to create dynamic streaks of light across your frame. To achieve this effect, use a relatively slower shutter speed and pan your camera along with the moving subject. This technique can result in visually striking images that showcase the vibrant atmosphere and the sense of motion during the blue hour.
Utilizing Fog and Mist
Fog and mist can add an element of mystery and atmosphere to your blue hour photographs. These weather conditions can create a soft, diffused light and a sense of depth in your images. Seek out locations that are prone to fog or mist during the blue hour and position your subject accordingly to make the most of these atmospheric conditions. As the soft light filters through the mist, it can create a magical and intimate atmosphere that adds a layer of enchantment to your images.
Creating a Mood
Choosing the Right Subject
The choice of subject can greatly impact the mood and overall feel of your blue hour images. Consider subjects that are enhanced by the soft, diffused light and the captivating colors of the blue hour. Natural landscapes, cityscapes, architectural structures, or even portraits can all be compelling subjects during this time of day. Think about the emotions or stories you want to convey through your photographs and choose subjects that align with those intentions. By selecting the right subject, you can create a mood that resonates with viewers and evokes a sense of wonder and beauty.
Experimenting with Different Emotions
The blue hour offers a canvas for exploring a wide range of emotions in your photography. From tranquility and serenity to mystery and nostalgia, you can convey a multitude of feelings through your blue hour images. Consider the composition, lighting, and color choices that align with the emotional tone you want to convey. Experiment with different subjects, angles, and settings to capture images that evoke specific emotions and tell a visually engaging story.
Telling a Story
Photography is a powerful medium for storytelling, and the blue hour provides an excellent opportunity to create narrative-driven images. Think beyond capturing a beautiful scene and consider the story or message you want to convey through your photographs. Incorporate elements that help tell this story, whether it’s the presence of people, interesting objects, or specific moments in time. The blue hour’s ethereal atmosphere can add an extra layer of enchantment to your storytelling, creating images that captivate and engage viewers on a deeper level.
Capturing stunning images during the blue hour takes careful planning, preparation, and a keen understanding of the unique qualities this time of day offers. By understanding the definition and duration of the blue hour, knowing how to choose the right equipment and camera settings, and applying composition and exposure techniques, you can capture images that are truly magical. Further, by mastering white balance, working with light, enhancing colors and contrast, adding movement and atmosphere, and creating a specific mood, you can elevate your blue hour photography to new heights. So grab your camera, head out during the blue hour, and let your creativity soar as you create images that evoke a sense of wonder and beauty.