Imagine the ability to transform ordinary scenes into mesmerizing works of art with just the flick of a camera shutter. You’ve probably wondered how photographers achieve those breathtaking light painting effects that seem to bring images to life. Well, wonder no more! In this article, we will unveil the secrets behind capturing stunning light painting effects with your camera. Get ready to embark on a journey of creativity and learn how to infuse your photographs with a touch of magic.

Understanding Light Painting
Definition of light painting
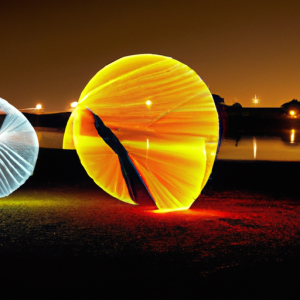
Light painting is a photographic technique that involves using long exposure and various light sources to create stunning and artistic images. By moving or manipulating light sources while the camera shutter remains open, you can produce a wide range of mesmerizing effects, such as light trails, orbs, and even intricate drawings or writings with light.
History of light painting
The origins of light painting can be traced back to the late 19th century, when artists and photographers like Étienne-Jules Marey and Georges Demeny used light sources attached to the body or limbs to capture motion in their images. However, the term “light painting” was coined much later in the 1960s by photographers such as Man Ray and Barbara Morgan, who experimented with the technique as a means of artistic expression. Since then, light painting has evolved and gained popularity, with contemporary artists pushing the boundaries of creativity.
Methods of creating light painting effects
To create mesmerizing light painting effects, there are several methods you can explore. Some of the most common techniques involve using external light sources such as flashlights, LEDs, and even fire. By moving these light sources in various patterns or trajectories while the camera shutter is open, you can achieve captivating light trails, orbs, and other forms. Additionally, you can employ advanced techniques such as multiple exposures or in-camera effects to further enhance your light painting creations.
Essential Equipment for Light Painting
Camera
The camera is the primary tool you’ll need to engage in light painting. To achieve the best results, consider using a digital camera with manual control options, such as a DSLR or mirrorless camera. These types of cameras allow you to adjust settings like shutter speed, aperture, and ISO, giving you precise control over your light painting exposures.
Tripod
A stable tripod is a must-have accessory for light painting. Since light painting typically requires long exposure times, keeping your camera steady during the exposure is crucial to prevent blurriness or unwanted camera shake. Choose a sturdy tripod that can hold the weight of your camera and will remain steady even in windy conditions.
External light sources
To create light painting effects, you’ll need various external light sources. Flashlights, LED wands, glow sticks, and even sparklers are popular choices among light painters. Experiment with different types of lights to achieve different colors and intensities in your images. Additionally, you may consider using light modifiers, such as diffusers or color gels, to further enhance the visual impact of your light painting.
Remote shutter release
A remote shutter release is a handy tool that allows you to trigger the camera without physically touching it. This is especially useful during light painting as it helps minimize camera shake caused by pressing the shutter button. There are various remote shutter release options available, including wired, wireless, and even smartphone apps that connect to your camera via Bluetooth or Wi-Fi.
Setting Up Your Camera
Choosing the right camera settings
When setting up your camera for light painting, there are a few key settings to consider. Firstly, set your camera to manual mode so that you have full control over the exposure settings. This will enable you to adjust the shutter speed, aperture, and ISO according to your creative vision. Additionally, using the RAW file format instead of JPEG will give you greater flexibility during post-processing.
Using a low ISO
To minimize digital noise and retain optimal image quality, it’s best to use a low ISO setting when light painting. Start with the lowest ISO value your camera offers, typically ISO 100 or 200. By keeping the ISO low, you’ll reduce the risk of noise and ensure that the focus remains on the light painting effects rather than unwanted artifacts.
Selecting long exposure time
Long exposure times are essential for capturing the full beauty of light painting. Set your camera’s shutter speed to a slower setting, ideally several seconds or even minutes, to allow enough time for the light sources to create their magic. Experiment with different exposure times to achieve the desired effect, and remember to keep your camera steady on a tripod throughout the duration of the exposure.
Aperture settings
The aperture setting determines the depth of field in your light painting images. For most light painting effects, a smaller aperture (higher f-number) is preferred to ensure a larger depth of field and sharper focus. However, in some cases, you may want to create a shallow depth of field to emphasize a particular subject or light source. Adjust the aperture according to your creative intentions and consider using manual focus for precise control over the sharpness of your light painting.
Choosing the Right Location
Considering dark and controlled environments
When choosing a location for light painting, it’s crucial to consider the lighting conditions. To achieve the best results, opt for dark and controlled environments where you have greater control over the light sources and their interactions. Indoor spaces, such as abandoned buildings or studios, are popular choices as they provide a blank canvas for your creativity and allow you to experiment without unwanted ambient light contamination.
Finding interesting backdrops
While choosing a dark environment is essential, don’t forget to consider the backdrop or surroundings that will be captured in your light painting images. Look for interesting textures, architectural features, or natural landscapes that can complement or enhance your light painting effects. Walls with graffiti, urban cityscapes, or serene natural settings can all serve as captivating backdrops for your creations.
Utilizing natural or artificial light sources
In addition to external light sources, you can also incorporate natural or existing artificial light sources into your light painting. Moonlight, starlight, street lamps, or even the headlights of cars passing by can all add an extra dimension to your images. Experiment with different ambient light sources and find ways to integrate them into your light painting compositions to create unique and visually striking results.

Creating Different Light Painting Effects
Light trails
One of the most common and visually impactful light painting effects is the creation of light trails. To achieve this effect, simply move a light source in a deliberate manner while the camera shutter is open. This can be done by waving a flashlight or LED wand in the air or even attaching a light source to a moving object, such as a bicycle or drone. The continuous movement of the light source will create beautiful and fluid trails of light in your image.
Orb and sphere effects
Orbs and spheres are another popular light painting effect that can add a sense of mystery and enchantment to your images. To create this effect, simply rotate a light source, such as a glow stick or LED ball, in a circle or arc while the camera shutter is open. The circular motion combined with the long exposure will result in vibrant, circular shapes that appear as if they are floating in mid-air.
Drawing or writing with light
One of the most creative aspects of light painting is the ability to draw or write with light. With a light source in hand, you can express your artistic ideas by “painting” in the air while the camera captures the movement. Whether it’s tracing shapes, writing words, or creating intricate patterns, this technique allows you to leave your own personal mark in the final image. Experiment with different light sources, strokes, and movements to bring your imagination to life.
Zoom burst
The zoom burst effect can add a dynamic and surreal quality to your light painting images. To achieve this effect, start with a wider focal length and slowly zoom in or out while the camera shutter is open. The combination of the zooming movement and the long exposure will create a burst of light that appears to radiate from the center of the image. This technique works best when there are strong light sources in the scene, such as streetlights or stars.
Multiple exposure
Multiple exposure is a technique that involves combining multiple images into a single frame. With light painting, you can take advantage of this technique to create complex and intricate compositions. Start by capturing a base image of the scene without any light painting, and then overlay it with subsequent images where you introduce different light painting effects. By carefully adjusting the exposure and timing, you can create stunning images that showcase a variety of light painting elements in a single photograph.
In-camera effects
Many modern cameras offer built-in special effects or features that can enhance your light painting images without the need for extensive post-processing. Features such as bulb mode, live composite mode, or multiple exposure mode can simplify the process and give you more creative control. Explore your camera’s menu options and experiment with these in-camera effects to discover new and exciting ways to elevate your light painting photography.
Tips for Successful Light Painting
Use a stable tripod
The stability of your camera during long exposures is crucial to achieve sharp and crisp light painting images. Invest in a sturdy tripod and ensure that it is set up on a stable surface. Avoid touching the camera or tripod during the exposure to minimize vibrations and camera shake that can result in blurry images.
Keep your light source moving
To avoid unwanted hotspots or burnt-out areas in your light painting images, keep your light sources in constant motion. This will create smoother and more even distributions of light, resulting in more balanced and visually appealing compositions. Experiment with different movements and trajectories to find the most pleasing effects.
Experiment with different light sources
Don’t limit yourself to just one type of light source. Explore a variety of light painting tools and accessories to expand your creative possibilities. Flashlights, LEDs, lasers, fiber optics, and even flame-based sources like steel wool or fire poi can all add unique characteristics and textures to your light painting images. Try combining multiple light sources to achieve more complex and layered effects.
Try various techniques
Light painting allows for endless experimentation and exploration. Don’t be afraid to try different techniques and approaches to achieve the desired effect. From simple gestures to complex choreographies, each technique can produce its own unique visual impact. Lean into your creativity and let your imagination guide you towards new and exciting possibilities.
Practice patience and persistence
Light painting is a skill that takes time and practice to master. Like any form of art, it requires patience and persistence to refine your techniques and develop your own style. Embrace the learning process and understand that not every attempt will yield perfect results. Keep experimenting and adapting your approach to improve and grow as a light painter.
Review and adjust settings
After capturing a light painting image, take the time to review the results and adjust your camera settings if needed. Pay attention to the overall exposure, sharpness, and color balance of the image. Make any necessary tweaks to refine the composition and ensure that the desired light painting effects are accurately captured. By reviewing and adjusting settings, you can continuously improve and fine-tune your light painting skills.
Post-Processing Light Painting Photos
Importing and organizing images
Once you have captured your light painting images, it’s time to transfer them to your computer and import them into a photo editing software. Create a well-organized folder structure to store and manage your light painting images, making it easier to find and work with specific files.
Basic adjustments for exposure and contrast
Begin the post-processing workflow by making basic adjustments to the exposure and contrast of your light painting images. Use tools such as exposure sliders, curves, and levels to optimize the overall brightness, shadows, and highlights in the image. Ensure that the light painting effects stand out without sacrificing the details in the shadows or highlights.
Enhancing colors and tones
Light painting often involves the use of vibrant and vivid colors. In post-processing, you can enhance these colors further or adjust them to achieve the desired mood or atmosphere. Utilize tools such as saturation, vibrance, or color balance to fine-tune the hues and tones in your light painting images. Experiment with different color adjustments to create the desired visual impact.
Removing unwanted artifacts or distractions
During the light painting process, it’s not uncommon to have unintentional artifacts or distractions in your images. These can include stray light streaks, unwanted reflections, or even accidental appearances of the light painter in the frame. Use tools like the healing brush or clone stamp to remove these distractions and clean up your image, ensuring a polished final result.
Adding special effects
Post-processing also allows you to further enhance your light painting images by adding special effects or creative touches. Experiment with tools such as brushes, filters, or layer blending modes to add unique textures, overlays, or vignettes. However, be mindful not to overdo the effects and maintain a balance that complements the original light painting.
Inspiration and Ideas for Light Painting
Exploring different subjects and objects
Light painting is a versatile technique that can be applied to a wide range of subjects and objects. Experiment with capturing light painting effects on landscapes, architecture, still life, or even portraits. Each subject offers new opportunities for creativity and artistic expression. Consider the textures, shapes, and forms of your chosen subject and find ways to enhance them through light painting.
Using light painting tools or accessories
Expand your light painting possibilities by using specialized tools or accessories designed specifically for this technique. Light painting brushes, which feature fiber optic strands or LED lights, allow for precise and controlled application of light in your images. Similarly, light stencils or gels can create unique patterns or shapes when combined with different light sources. Embrace these tools and accessories to add depth and variety to your light painting repertoire.
Drawing inspiration from other artists
Light painting has a vibrant and supportive community of artists who continuously push the boundaries of creativity. Draw inspiration from fellow light painters by studying their techniques, analyzing their compositions, and appreciating their unique styles. Explore online communities, galleries, or photography books to discover new ideas and approaches that can elevate your own light painting work.
Collaborating with fellow photographers
Light painting can also be a collaborative and social art form. Join forces with other photographers, light painters, or even models to create collaborative light painting projects. By pooling your knowledge, skills, and ideas, you can create dynamic and visually rich images that merge multiple perspectives. Collaborations not only foster creativity but also provide a platform for learning and exchanging insights with like-minded individuals.
Safety Considerations
Avoiding light painting in hazardous areas
When engaging in light painting, it’s crucial to prioritize safety and avoid hazardous areas. Be mindful of your surroundings and ensure that the location is free from potential dangers such as active roads, steep cliffs, or unstable structures. Always choose a safe and controlled environment to minimize the risk of accidents or injuries.
Being mindful of personal safety
While exploring new and exciting light painting techniques, ensure that you prioritize your personal safety. Avoid putting yourself in dangerous positions or compromising your well-being for the sake of a photograph. Be cautious when using light sources that generate heat, such as fire-based tools, and take necessary precautions to prevent accidents or burns.
Respecting the surroundings and nature
As a light painter, it’s important to respect the environment and the surroundings in which you work. Avoid causing any damage to natural or man-made structures and always clean up after your session. Be aware of any environmental restrictions or regulations that may apply to the location you choose and adhere to them accordingly.
Obtaining necessary permissions
Some locations may require you to obtain permissions or permits before engaging in light painting. This is particularly true for private properties, national parks, or historical sites. Always ensure that you have the appropriate permissions in place and respect any restrictions imposed by the authorities or property owners. By doing so, you can avoid legal consequences and maintain a positive reputation within the photography community.
Challenges and Troubleshooting
Dealing with overexposure or underexposure
One of the common challenges in light painting is achieving the correct exposure. Overexposure, where the image appears too bright and lacks detail, can occur when the light source is too intense or when the exposure time is too long. Conversely, underexposure, where the image appears too dark, can happen with insufficient light or a too-short exposure time. Experiment with different exposure settings, adjust the intensity of your light sources, and review your histogram to achieve the desired balance of light and detail.
Managing light contamination
Light contamination occurs when unwanted ambient light sources affect your light painting images. To minimize this issue, choose dark and controlled environments, far away from external light sources such as streetlights or nearby buildings. Utilize light modifiers such as flags, barn doors, or snoots to control the direction and spread of your light sources, ensuring that they are focused solely on your intended subjects.
Avoiding camera shake
Camera shake can occur during light painting if you accidentally jostle the tripod or press the shutter button, resulting in blurry images. To prevent camera shake, use a remote shutter release or a timer delay to trigger the camera without touching it directly. Additionally, ensure that your tripod is set up on a stable surface and avoid any unnecessary movement or contact with the camera during the exposure.
Preventing accidental light leaks
Accidental light leaks can occur when light from your light sources inadvertently enters the camera through unintended gaps or openings. Ensure that the camera is securely attached to the tripod and double-check for any loose connections or gaps that may allow light to leak into the camera. Cover any unnecessary openings or use light-blocking accessories such as lens hoods or black foam to minimize the risk of light leaks.
Addressing technical issues
Technical issues such as battery drain, memory card full errors, or camera malfunctions can be frustrating during a light painting session. Always carry spare batteries and memory cards to avoid interruptions. Familiarize yourself with your camera’s settings and functions, and keep it well-maintained to minimize the risk of technical issues. Regularly update your camera’s firmware to ensure optimal performance and compatibility with any new accessories or software updates.
In conclusion, light painting is a versatile and captivating technique that allows for unlimited creativity and experimentation. By understanding the basics of light painting, equipping yourself with the necessary tools, and following essential tips, you can successfully achieve stunning light painting effects with your camera. Remember to prioritize safety, practice patience, and continuously explore new concepts and ideas to push the boundaries of your light painting photography.