Looking to add that extra depth and artistic flair to your photos? You’re in the right place! In this article, you’ll discover the tools, techniques, and tips to master the intriguing bokeh effect. By the final paragraph, you’ll be a whizz in transforming even the most simplistic of your images into captivating, vibrant snapshots teeming with life. Ready to take your photos from ordinary to extraordinary? Let’s begin your bokeh effect journey today.
Understanding the Bokeh Effect
Brief explanation of bokeh effect
Bokeh effect, derived from the Japanese word “boke” meaning blur, is a popular photography technique that highlights the subject in a photograph by blurring out the background. When you see an image where the main subject is in sharp focus, while the background light sources take on a blurred, aesthetically pleasing form, you’re observing the bokeh effect.
The aesthetic attributes of bokeh
The bokeh effect’s charm comes from its ability to isolate and draw attention to a particular subject, while maintaining visual interest in the background. This effect can give your photos a professional, artistic look. The quality of bokeh is subjective, it can range from being pleasant and creamy, to harsh and unpleasant – depending on the photographer’s intent or the viewer’s perception.
Why photographers use bokeh
Photographers utilize the bokeh effect to create a sense of depth and dimension in photographs. The blur softens the background, reducing distractions and allowing the main subject to dominate the frame. Bokeh is often used in portrait photography, macro photography, and any image where the intention is to emphasize a specific detail over others.
The Science Behind Bokeh
Understanding lens diffraction
Lens diffraction plays a significant role in the bokeh effect. It’s a phenomenon in physics where light passing through an aperture (like a camera lens) spreads out, causing light sources behind the subject to take on a specific shape or pattern. Bigger apertures spread the light less, creating a larger, softer blur, while smaller apertures diffract light more, creating a smaller, harder blur.
How depth of field impacts bokeh
Depth of field is the distance between the nearest and furthest objects that appear in acceptably sharp focus in a photograph. A shallow depth of field will make only a small part of the image sharp, with the rest blurred out, increasing the potential for bokeh effect. Conversely, a larger depth of field will result in more elements being in focus and less bokeh.
The effect of aperture shape on bokeh
Interestingly, the shape of the camera’s aperture affects the bokeh effect too. The aperture shape determines whether the out-of-focus points of light will appear as circles, hexagons, or another shape. The smoother and rounder the aperture edges, the more circular and softer the out of focus points will be, resulting in a smoother bokeh effect.

This image is property of pixabay.com.
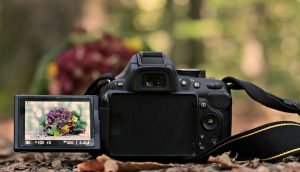
Selecting the Right Equipment for Bokeh Effect
Choosing a lens with a large aperture
To create the bokeh effect, a lens with a large aperture (low f-number) is ideal. It allows more light into the camera and generates a shallower depth of field, resulting in a more prominent bokeh effect. Prime lenses are especially good for generating bokeh due to their wide apertures.
Selecting a camera that allows manual settings adjustment
A camera with adjustable manual settings is essential. You’ll need the ability to manually control the aperture, focus, and shutter speed to optimally create the bokeh effect.
The role of DSLR and mirrorless cameras in creating bokeh
DSLR and mirrorless cameras are the preferred choice for bokeh photography due to their ability to switch lenses and adjust manual settings. These cameras provide the flexibility to manipulate factors like depth of field, exposure, and most importantly, to accommodate fast lenses that can open to large apertures which are prerequisite for achieving prominent bokeh.
Comparative overview of different camera types for bokeh
While DSLR and mirrorless cameras are the gold standard for capturing bokeh, other camera types can do the job too. Point-and-shoot cameras and even smartphones with portrait modes can be used to create the bokeh effect, albeit with less control over the final result.
Setting Up Your Camera for Bokeh
Adjusting aperture size
To achieve the bokeh effect, start by setting your lens to its widest aperture (smallest f-number). This will allow maximum light into the sensor, thereby creating a shallow depth of field.
Setting the focus
Focus is critical in bokeh photography. Once the aperture is set as wide as it can go and the subject is in focus, the background should naturally blur. Play around with the manual focus until you achieve the desired level of bokeh.
Optimal camera settings for bokeh
In addition to adjusting the aperture and focus, you may need to adjust your ISO and shutter speed to control the exposure of the image. Remember, creating bokeh involves manipulating the elements of the exposure triangle (aperture, shutter speed, and ISO) to create an image that highlights your subject with a beautifully blurred background.

This image is property of pixabay.com.
Choosing Your Subject and Background Wisely
The importance of subject-background distance
The distance between your subject and the background directly impacts the effectiveness of bokeh. Greater distance allows for more pronounced and smoother bokeh. So, keep a good amount of distance between your subject and the background for a stunning bokeh.
Selecting a subject for bokeh photography
When choosing a subject for bokeh photography, consider textures, colors, and shapes. Anything that stands out and grabs attention is ideal.
Elements of a good background for bokeh
For bokeh photography, backgrounds with points of light or a variety of color palettes work best. These elements will produce vibrant, stunning blobs of bokeh when out of focus.
Utilizing Lighting for Bokeh
The role of natural light in bokeh
Natural light can create beautiful bokeh, especially when you’re photographing outdoors. Sunlight streaming through leaves or reflecting off water can create brilliant points of light for a stunning bokeh effect.
Using artificial light to create bokeh
Artificial lights like lamps, fairy lights, and even street lights can create beautifully impactful bokeh. The key is to experiment with light positioning and intensity to create diverse effects.
Proper positioning of light sources for bokeh
How you position your light sources can dramatically affect bokeh. Light sources closer to the camera can produce larger bokeh circles, while those further away will render smaller circles.

This image is property of pixabay.com.
Practical Techniques for Capturing Bokeh
Shooting at different distances
The distance from the camera to the subject and the background can be manipulated to control bokeh. Changing distances provides unique opportunities for producing different bokeh effects.
Exploring different angles
Experiment by shooting your subject from various angles. Sometimes, a slight shift in angle can bring about a dramatic difference in the amount and quality of bokeh.
Manual focus versus autofocus for bokeh
Although autofocus can be handy, manual focus gives you greater control over the bokeh effect. With manual focus, you can decide precisely where the camera’s focus will be, allowing for the background to blur perfectly into bokeh.
Post-Production Bokeh Enhancement
Utilizing image editing software
Image editing software like Adobe Photoshop and Lightroom can be effective tools to enhance bokeh in post-production. Simple tweaks to contrast, brightness, and saturation can make your bokeh pop.
How to enhance bokeh in post-production
Ideally, bokeh should be captured in-camera, but there are ways to enhance it in post-production. Sharpness can be reduced in the out-of-focus regions, and highlights can be boosted to make the blurred light points pop.
Tricks for making bokeh more prominent in edited photos
Creating a shallow depth of field in post-production can bring out the bokeh. Also, you can use radial filters or blur tools to soften edges in the background, making the bokeh more prominent.

Common Mistakes and How To Avoid Them
Blur and bokeh confusion
A common mistake when trying to achieve bokeh is confusing blur with bokeh. Not all blurs are bokeh, but all bokehs are blur. To avoid this, always remember that bokeh refers to the aesthetic quality of the out-of-focus areas in the photograph.
Avoiding too much bokeh
Having too much bokeh can distract from the main subject. Aim to balance your use of bokeh so that it enhances your main subject rather than overpowering it.
Ensuring subject remains in focus
When trying to achieve bokeh, it’s essential to keep the main subject in sharp focus, or you risk blurring the whole picture which would make it lose its intent.
Keeping an eye on exposure and lighting
Overuse of lighting, particularly artificial lighting, can cause overexposure, which could ruin your bokeh effect. It’s important to manage your light sources wisely and take care of exposure.
Inspirational Bokeh Examples and Ideas
Showcasing successful bokeh photography
There are inspirational bokeh photos everywhere. Keep an eye out for them, as they are excellent sources of learning and idea generation.
Ideal scenes and subjects for bokeh
Almost any subject or scene can be suitable for bokeh. From shimmering city landscapes to intimate portraits to the delicate veins on a leaf, the potential to create stunning bokeh is endless.
How different photographers utilize bokeh
Each photographer has their unique style and vision. Looking at how different photographers use bokeh can help you learn and develop your bokeh photography skills. Whether for dramatic effect, to evoke an emotional response, or to add artistic flair, the versatile and beautiful bokeh can transform a simple photograph into a captivating image.
